Blade Alignment
I see no need for precision tools to make adjustments when it all changes a little as soon as the saw is running. As long as the saw isn't worn out or has excessive slack in the arbor bearings this method is fairly accurate. This is the method I use, it's quick and easy and I get good results with a minimum amount of tools and effort.
The first thing is make sure the saw is unplugged. Never work on or make adjustments with the saw plugged in.
I begin by installing a new blade on the saw. The next step is to find the neutral zone or portion of the blade. This is the area of the blade that is closest to square with the arbor and the line that the blade seeks when the centrifugal force is in effect while the saw running.
 I begin by raising the blade all the way to the top then backing it down until it's just off the top stop about 1/8" or so.
This gives a maximum amount of blade to work with while it's not influenced in any way by the stop.
I begin by raising the blade all the way to the top then backing it down until it's just off the top stop about 1/8" or so.
This gives a maximum amount of blade to work with while it's not influenced in any way by the stop.
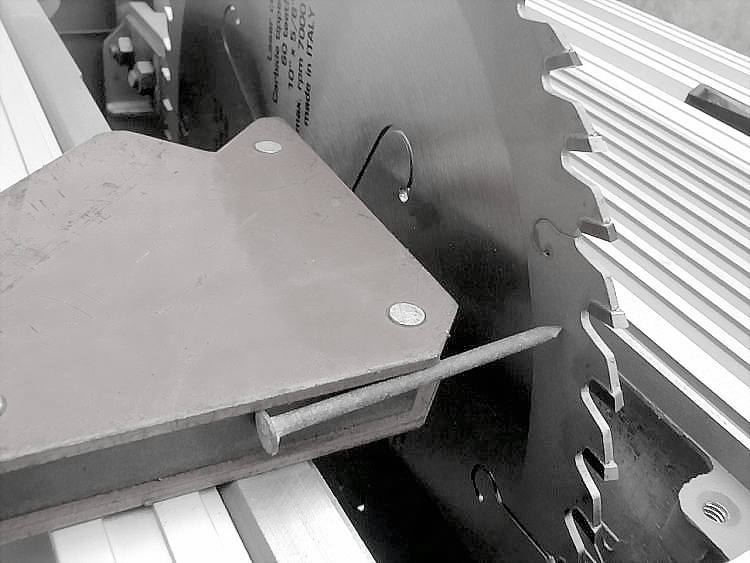
Here I have the blade set up with extremely sophisticated alignment tools, a nail stuck to a magnet.
Any pointed metal object with a little weight to it will work fine.
I like to use a pointed metal object because it makes a light screeching noise when it comes in contact with the blade.
I rotate the blade by hand with a pencil and take notice where the nail first comes in contact with the blade and where it no longer touches the blade.
I count the number of teeth where the nail was in contact with the blade and divide this in half and make a mark on the blade with a magic marker.
 I repeat the same procedure on the opposite side of the blade.
At this point the marks on the blade should be pretty close to 180° apart.
If the marks aren't 180° apart on the blade repeat the process again.
If the same results are attained the second time the blade has a serious problem and I wouldn't recommend using it for precision work.
A good quality blade should have around 0.003" or so of runout or less, about the thickness of a human hair.
Low quality blades can have as much as 0.010" or more of runout and aren't suitable for precision work.
 Now that the neutral zone of the blade has been located and marked the adjustments can be made.
With the marks on the blade in the horizontal position the saw tilt angle stops and indicator can be adjusted.
Now that the neutral zone of the blade has been located and marked the adjustments can be made.
With the marks on the blade in the horizontal position the saw tilt angle stops and indicator can be adjusted.
Place the tilt angle against the stop at 0° and check it with a square.
Check it from both sides of the blade and adjust the stop as needed.
Move the tilt angle to 10° then back against the stop and check it again.
When the 0° stop is adjusted properly adjust the indicator on the angle scale on the front of the saw to 0°. Cut a thick piece of stock to check the 90° angle.
Repeat the process using the 45° angle of the square to adjust the 45° stop. Cut two thick pieces of stock to check the squareness of the two 45° angles together.
Make adjustments as needed.